Tuesday, March 30, 2010

Michelle Perkett Challenge #23

This is my DT project for this week's challenge at Michelle Perkett Studio. The challenge this week is "Anything but a Card"...right up my alley lol! I LOVE to make 3D projects.

I decided that seeing as how I was going to Victoria to visit my other 2 grandkids, I'd make up a little parcel of presents for each of them. Hannah's bedroom is decorated in purple...one of my favourite colours...so I made a purple frame for her to put on her shelves.

The frame is a Kaiser wood 25cm square frame. I painted the frame in metallic purple craft paint and papered the front with Kaiser paper from the Airy Fairy collection. From another sheet of paper I cut out 2 of the butterflies and mounted them over the corresponding butterflies on the frame, to give some dimension. The butterflies have been highlighted with dimensional glaze, a little glitter and spritzed with Glimmer Mist...I've just discovered this product...it's LOVELY :)

The Butterfly Fairy, available from Michelle's Etsy shop, was printed onto Neenah Classic Crest paper and coloured with Copics. She was then highlighted with glitter pens, her wings glittered and the whole image spritzed with Glimmer Mist. The image was cut out and mounted on dimensional dots.

CM alpha stickers were used for Hannah's name and a small Kaiser rhinestone used in the centre of the starburst near her name. And of course the frame was finished off with a photo of our beautiful little  girl.


BRODY'S FRAME
Although it's not part of the challenge, I also made Brody a frame for his room. He has a quilt cover that has bright little cars on it so I went looking for a car image to put on his frame...unfortunately Michelle doesn't have boy images in her collection...might have to have a serious chat with her about that LOL!!...I found this one at Mo's Digital Pencil.

The frame is the same size as Hannah's. The frame was painted with royal blue craft paint and paper from the Kaiser Esperance collection was used for the front.

The image was printed onto Neenah Classic Crest and coloured with Copics. Dimensional glaze was used on sections of the car to add depth. The image was then cut out and mounted on dimensional dots.  CM alpha stickers were used for Brody's name.

And of course the photo of Brody is very cute :)  [Notice his little stuffed toy joey hanging on the net behind him...soooo cute]

Monday, March 22, 2010

MIA

Hello everyone....just wanted to let you know that I'll be MIA for about 2 weeks. I'm off to visit my beautiful interstate grandchildren (and their parents, of course, lol!) and catch up with some good friends. I am soooo looking forward to seeing them...and cuddling my grandbabies :)

I have scheduled a post for the 30th March but other than that, no posting from me until after Easter :(

See you soon...and have a lovely and safe Easter!

PS  I'm taking some colouring with me...couldn't go that long without some crafting...the withdrawals would be drastic!!!!!!!

Saturday, March 20, 2010

Under the Sea

Finally I have managed to get this project out of my head and into the world...YAY!  This "advent calendar" was a new release from Kaiser for Christmas last year. As soon as I saw it I wanted to make one, but not as an advent calendar....I immediately saw it as a fantastic craft storage unit for all the little embellie bits we collect! I wanted to make it look like an aquarium, with one of Michelle Perkett's mermaids as the feature. I wasn't sure how I was going to do the background but thanks to one of my lovely, talented, online friends, Ileana (who used a digi kit to do the background in her "Fish Box"), I went looking for a digi kit...found the perfect one HERE...called Mysterious Deep :)

To start, I painted the wood pieces...and there were LOTS of them!...with turquoise craft paint. Printed out one of the elements from the digi kit as my background, with a couple of fish, seahorse and an octopus added. The DP used for the drawers is Kaiser from the Airy Fairy collection. I've used this paper a few times now and it's become one of my favourites.

The mermaid is Tutti Frutti Mermaid from Michelle Perkett...available in Michelle's Etsy shop HERE. She was printed onto Splendorgel 190, coloured with Copics then highlighted with glitter, glitter pens, Kindy Glitz and Kaiser pearls. The finished image was cut out and mounted on dimensional dots.

To finish the "aquarium" I added a couple of plastic plants from the local pet shop (when I was explaining to the lady what I wanted them for, she just looked at me like I'd lost my marbles LOL!!) and a collection of shells.

I am soooo happy to have this completed! It was a lot of work but I'm really happy with the result. I'd love to make one each for my little granddaughters for their bedrooms....I think these would be perfect decorated to match their rooms, to keep all the little girly things in that they seem to love collecting :) I will have to think about it for a while and do one at a time...I was a bit over doing the drawers by the time I finished this one!!!

A close up of the "aquarium".............
 

and the mermaid..................

Sunday, March 14, 2010

JAI Challenge #8

The challenge at Just Add Ink this week is Just Add Easter! I don't normally get carried away with Easter presents, other than giving the kids an egg or bunny, we don't give Easter gifts. When I saw the amazing DT creations this week at JAI, I knew I wanted to play :) They totally inspired me to get all Eastery lol!!! Add to that the fact that I just LOVE 3D projects and I was definitely motivated to do something!

Seeing as how I'm going to Victoria on 23rd (yes, I'm counting the days!) to see my son and family, I decided to make Easter boxes for Hannah & Brody...my grandbabies...well, not babies anymore...they are 8 & 5! My, how time flies by!!! It's been 13 months since I last saw them and I'm sooo looking forward to cuddles :)

Ages ago I found a tutorial HERE for these little treat box/bag things (I have a thing about treat boxes...don't I Helen!!) so I printed it out and filed it. I wanted to make a bigger version to hopefully fit a bunny and some eggs inside so I set about adjusting the dimensions. (My version has a box with the front & back made separately) I also added a flap closure to the top instead of ribbon ties. My version is 4 1/2" wide x 7 3/4" high, not including the flap.

I had to get "creative" with the images...Ornament Trevor (obviously without his ornaments lol!) and Autumn Emma (without her pumpkin!)...from CC Designs at All That Scraps.  I LOVE the Sugarplums designs...they are just so darn cute :) I coloured with Copics and cut the images out so I could raise them on dimensional dots. CS is SU Pale Plum and CM Navy. The eggs, tag and DP behind Emma are from the digi kit Hoppy Hearts by Nit Wit. DP behind Trevor is from a Grant paper pack. Ribbon is Kaiser grosgrain. The wagons have been coated with dimensional glaze and the eggs highlighted with glitter pens and Stickles.  The Emma flap was made with my SU lace punch and Trevor's flap was hand cut.
Well, there you have it...my first Easter project!!! They were a lot of fun to make :)

Tuesday, March 9, 2010

Michelle Perkett Challenge #20

 
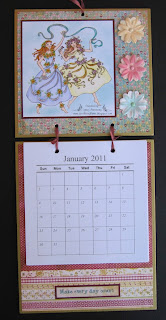
This is my DT contribution to the Michelle Perkett Studio challenge #20. This is a 'recipe' challenge...3 different DP, 3 flowers and 3 buttons or brads.

I made this calendar with a Kaiser wood product.  It measures approx 16 x 34 cm. The wood is painted with gold green metallic craft paint. The DP is from the Basic Grey 6" paper pad 'Lemonade'. The 2 papers on the bottom section of the calendar were joined with DS tape.

The image is Sisters of Spring from Michelle's Etsy shop.  It was printed onto Splendorgel 190 and coloured with Copics. The background was sponged with SU Baja Breeze ink. Areas of the image were highlighted with glitter pens.  The finished panel was matted with SU Bravo Burgundy. The caption at the bottom is printed from the computer onto a piece of DP from the same paper pad and matted with Bravo Burgundy...it reads...Make every day count

The calendar notes were created in Publisher, printed onto copy paper and cut out. The flowers and brads are from my (considerable!!!) stash :)


Here are the Sisters...aren't they lovely! Michele's art is sooo beautiful to colour :)

Friday, March 5, 2010

Harmony Calendar

 
This is another Kaiser wood calendar. I really enjoy making these wood products and this calendar form is one of my favourites. Everyone needs a calendar and these are something a bit different from the bought ones :)

The Harmony Goddess is from Michelle Perkett Studio. She has been printed on Spledorgel 190 then coloured with Copics. The sun has been glittered with AED Golden Sunset and Kaiser rhinestones used to highlight. Glitter pens have been used to highlight parts of the design. The coloured panel is matted with black CS and mounted with dimensional dots.

The calendar measures approx 16cm x 34cm when finished. It was painted with bronze metallic craft paint. The DP is Kaiser from the Empire Collection...I love this paper...it looks so rich and regal. The calendar notes were created in Publisher and printed on the computer. Ribbon is from my stash.


I know I keep saying it...Michelle's images are such fun to colour...just love them!!

Door Hangers

 
These little hangers are Kaiser wood products.  They don't look very inspiring in the raw but when I saw them I thought they might be transformed with decorating :) Something a little different! 

They were base coated with craft paint and papered on both the front and back. The fairy image is Ariana from Michelle Perkett Studio and the cute little pixie is a CC Design called Leisel. Both images were coloured with pencils. Glitter and glaze pens were used to highlight. The DP is Kaiser and Doodlebug (didn't realise there was a Doodlebug Designs in paper until after I registered my business name!!!!). The flowers in the barrow are from a 3D border sticker. Both images have been mounted on dimensional dots.


A close up of Leisel...isn't she cute!!

Monday, March 1, 2010

Follow your Heart Mirror

 
Here is another Kaiser wood mirror. This time I decided to leave the mirror section out for the photo!!! Much easier :)

The frame was painted with burgundy craft paint. The DP is Kaiser Dancing Jewel...it features dragonflies and is just beautiful! The image is Fire from Michelle Perkett Studio. Michelle has so many beautiful images in her Etsy shop...I have quite a collection of them now :)...it's so hard to choose which one to use on which project lol!

I printed Fire on Neenah CLassic Crest, coloured with Copics and highlighted with a glitter pen. I cut her out and mounted her on dimensional dots. The dragonfly was cut from one of the coordinating papers. Dimensional glaze was used on the body and the wings are coated with clear glitter pen. I made the antennae from beading wire and the eyes are tiny rhinestones. Only the body has been adhered to the frame to give it a more 3D effect. The caption is a stamp from the SU set Whimsical Words and says "Follow your heart - it knows the way".

This would also be nice as a frame. I'm really enjoying making these 3D projects :)

LinkWithin

Related Posts with Thumbnails